![]() In
order to facilitate downloading entire books of the bible with one click, I
have zipped the many mp3 files into single zipped files. Before you can play
these files, they must be unzipped, or extracted back into individual mp3 files.
The following tutorial will help you with this process.
In
order to facilitate downloading entire books of the bible with one click, I
have zipped the many mp3 files into single zipped files. Before you can play
these files, they must be unzipped, or extracted back into individual mp3 files.
The following tutorial will help you with this process.
This tutorial assumes you are running Windows XP.
Once the download is complete, you can press the Open Folder button on this dialog box. You will be able to see the zipped file you just downloaded. |
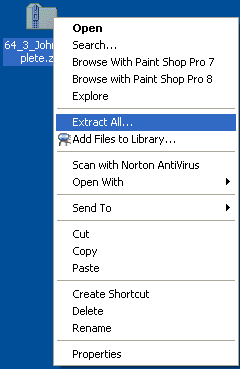
 To start the extraction process, Right click on the file and select Extract
All from the pop up menu. To start the extraction process, Right click on the file and select Extract
All from the pop up menu. |
Click the Next button. |
To point to a proper location, click the Browse button. |
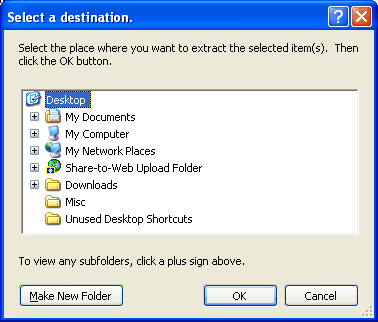
 At the "Select a destination" window, click on the folder within
which you want to create the destination folder. For instance, you can highlight
Desktop. At the "Select a destination" window, click on the folder within
which you want to create the destination folder. For instance, you can highlight
Desktop. |
Press Enter to finish the renaming process. Then click OK. |
| Back at the Extraction Wizard click the Next button. |
|
The quickest way to begin playing them in order is to click the Play all button on the left of the window. If this Play all button is not available, you must tell your audio player where the files are stored. You can use the generic mp3 player on your computer such as Window Media Player. I personally use the Real Player. Whichever player you use, open it and go to the Library. Then move it to one side and go back to the window where all your files have just been stored. I would suggest you highlight them all by pressing Ctrl A and then drag them all onto your favourite audio player. Now make sure they are in the proper file order, and if not, click on the column heading called Name. To start playing, double click on the first file and enjoy Dr. McGee's insights into God's word. |
I trust this help. Should you have any questions, email me at johna@johna.ca